- Local Guides Connect
- :
- General Discussion
- How to make Tiny Planets ?
- Subscribe to RSS Feed
- Mark Topic as New
- Mark Topic as Read
- Float this Topic for Current User
- Bookmark
- Subscribe
- Mute
- Printer Friendly Page
10-05-2017 07:14 AM - edited 05-04-2018 03:55 PM
How to make Tiny Planets ?
We Local Guides tend to see the world with a very different perspective.
We cherish every photograph we take and we would love to map the whole world (if possible). For us its all about the perspective, the beauty around us, to help people in our community and guess on top of everything else, we Local Guides love to show everyone the world we live in.
I figured out a way to to present my 360 photos and my world with a very different perspective - we call it a Tiny Planet.
Though I havn't created the technique to present the 360 world in a Tiny Planet form, but, I am very proud to give you a short tutorial that is going to help 360 photo lovers to present their world with a different perspective.
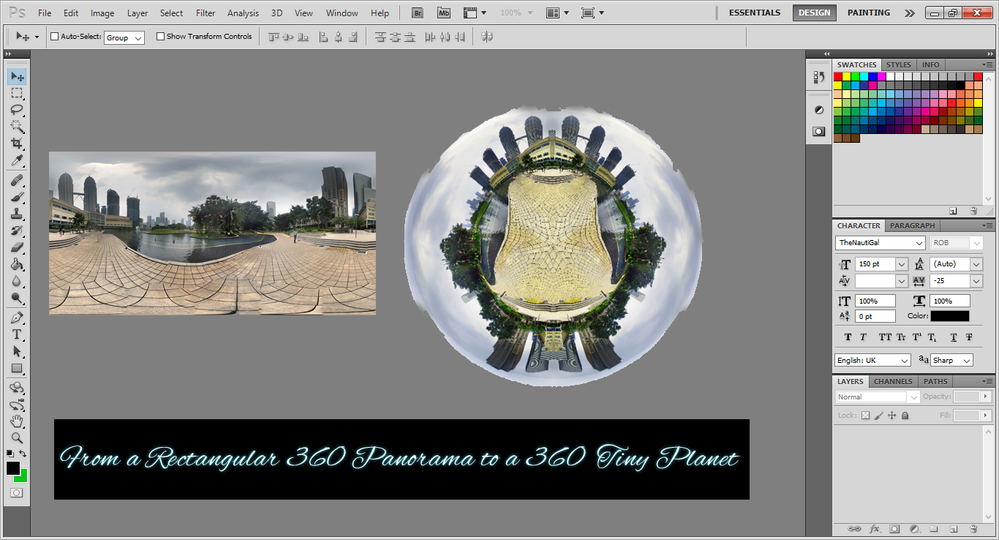
And once we are done, we will have something like this 🙂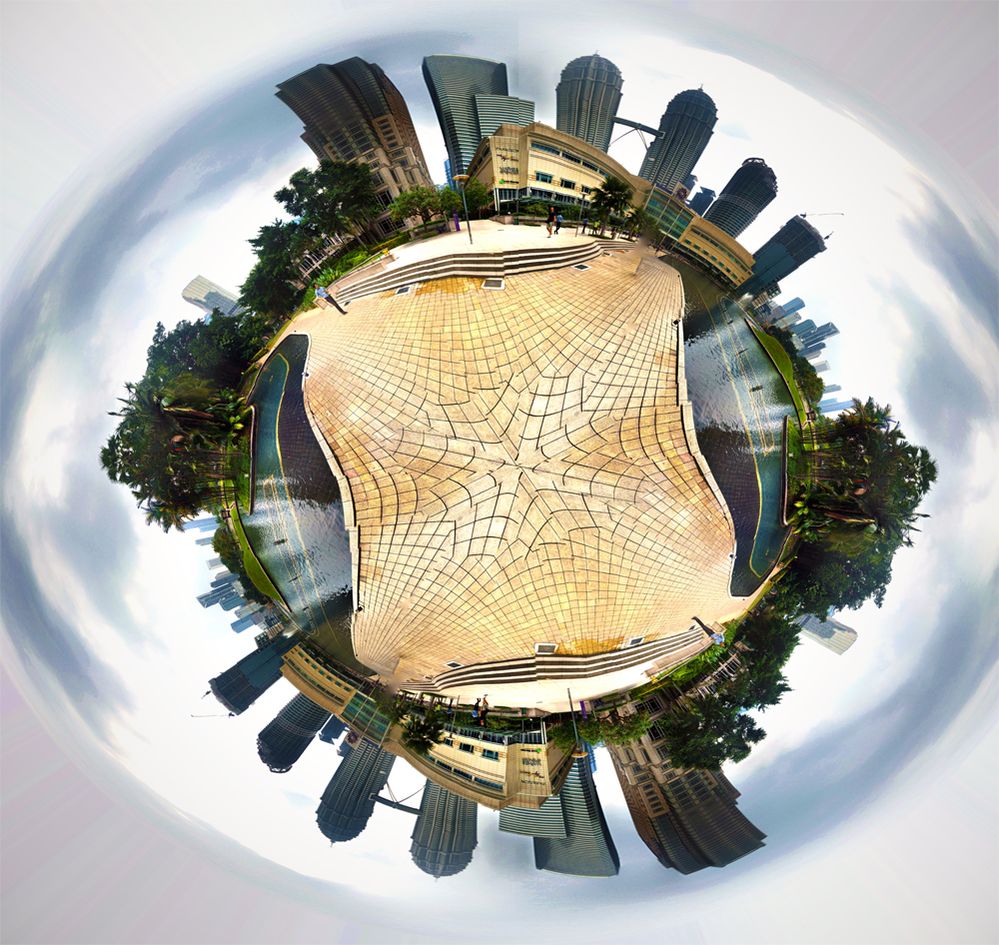
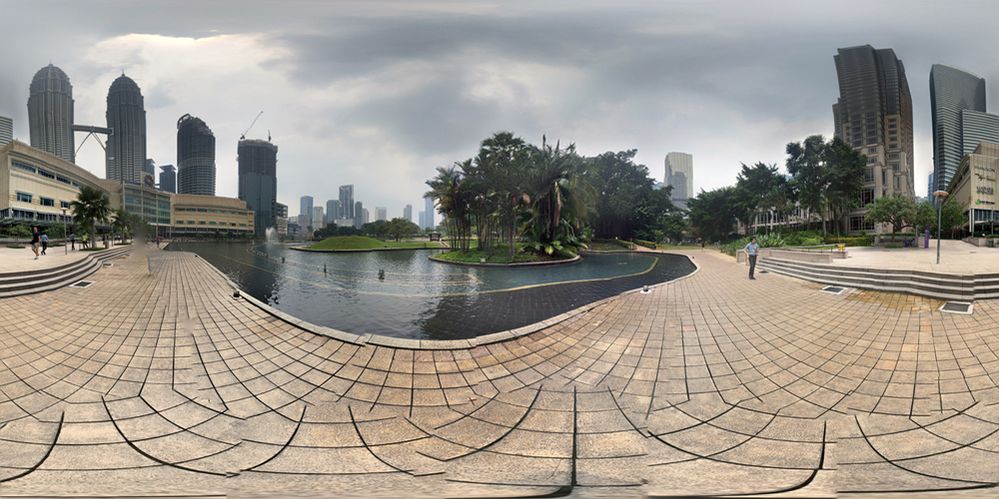
I am going to use a 360 photograph of Twin Towers (Kuala Lumpur) that I took using Google streetview app on my iphone.
The 360 photograph is normally saved in our album and looks like a very long rectangular panorama, well, something like the one below
Do we need a Tool to make those Tiny Planets?
Yes, we, do. I am going to use Adobe Photoshop CS5 for this tutorial (any Adobe Photoshop version can easily do this trick)
Let's get started:
Step 1:
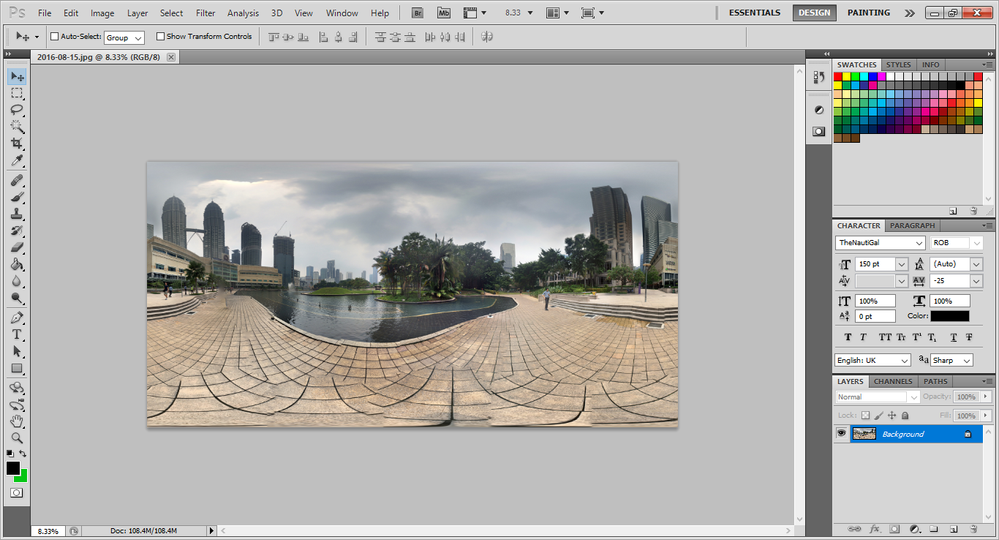
We need to open up our 360 Rectangular panoramic image into photoshop
Step2:
Next, it is very important to know the actual image dimensions, because we are going to be working with them a lot
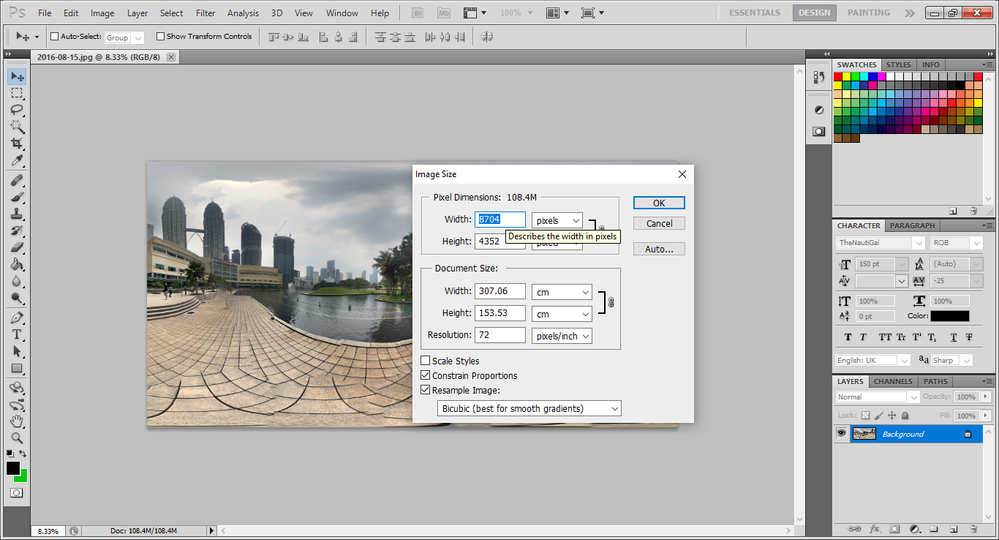
So, In order to find out the image dimensions, you have to go to:
Image > Image Size
A pop-up will then give you all the desired information about your image size, just like it is mentioned in the picture below
Step 3:
Now, imagine this. Right now we have a full 360 rectangular panorama and we wish to make a sphere out of it. If we try to wrap this image around our sphere, we will only be able to wrap one half of it (which is actually 180 degrees of goodness). So, we need to be able to have the other 180 degrees (a sphere is a 360 degree, folks) in order to wrap our sphere with the gorgeous 360 photo that i already took.
If we choose to select a different picture here, our tiny world would then be made up of two different pictures of two different places, which is something we do not want.
Instead, we would like to have an exact replica of our first picture so that we wrap around our sphere with exactly the same photo.
Its like wrapping the sphere's right side with the original photo and then wrapping the left side with the mirror image of the same photo.
So, in order to do that, what we need the most is double the size of the canvas to fit in the mirror of the photo we are already using (remember, we noted the image dimensions in last step? This is exactly why we needed them).
Now, we are going to :
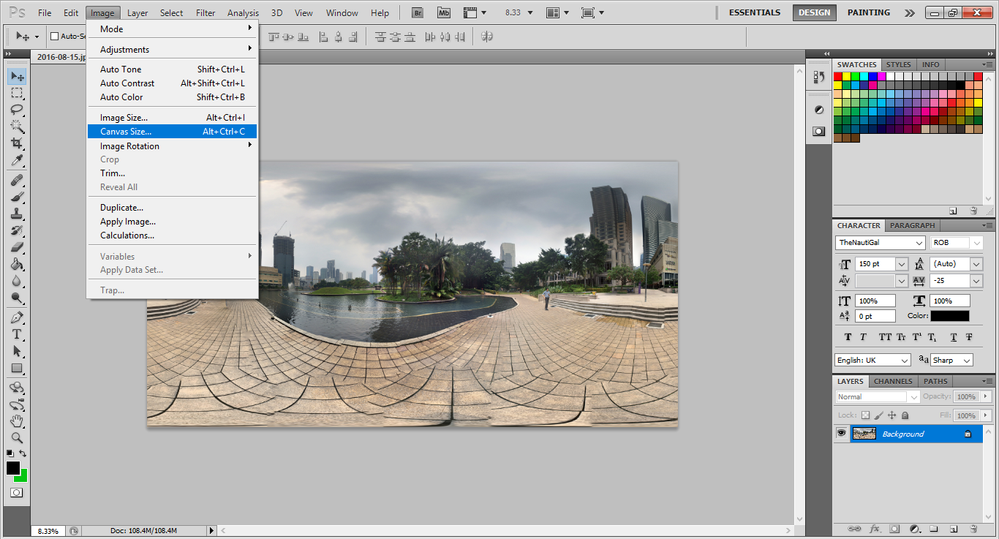
Image > Canvas Size to increase the size of the canvas
Now, a new pop-up will appear and we must provide the new canvas size. Please follow the picture below for the new canvas size. It is now set to be 17408 which is exactly twice the size of my original picture (which was 8704 pixels). Yes, we are not going to change the Height. We just want a double width canvas for now.
Step 4:
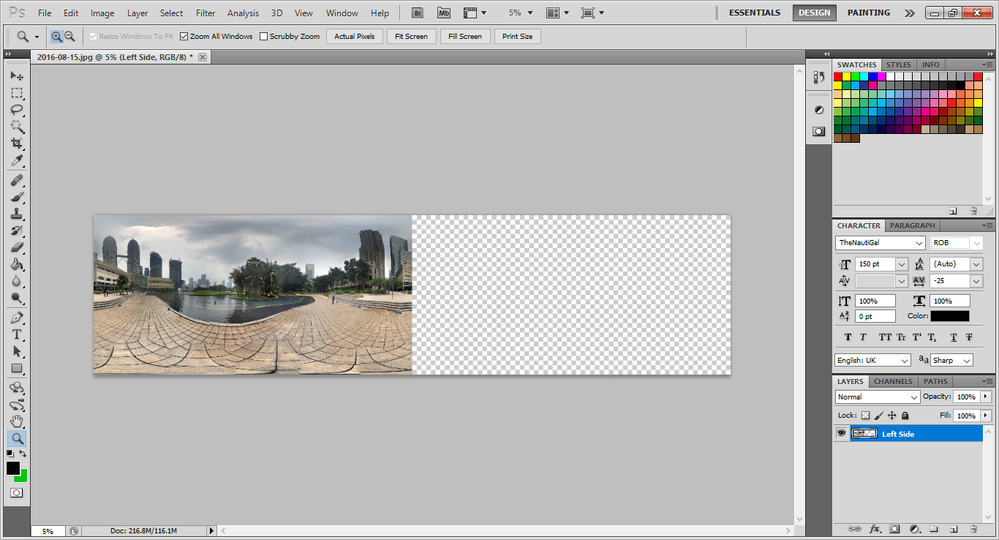
Once we have provided the canvas size, the Adobe Photoshop Interface and our design canvas will look something like this:
Have you noticed the empty transparent area? This is where we would like to put the mirror image.
Have also noticed that I already renamed my Layer to left side. well, the name itself makes no difference, but it does provide a starting point that we have our left side ready and we need to provide a new layer to cover the right side.
Step 5:
It is where we duplicate the layer and align it properly in the transparent empty space.
In order to duplicate the layer, we have to go to:
Layer > right click > Select Duplicate Layer
OR
We can also use the shortcut key : Ctrl + J
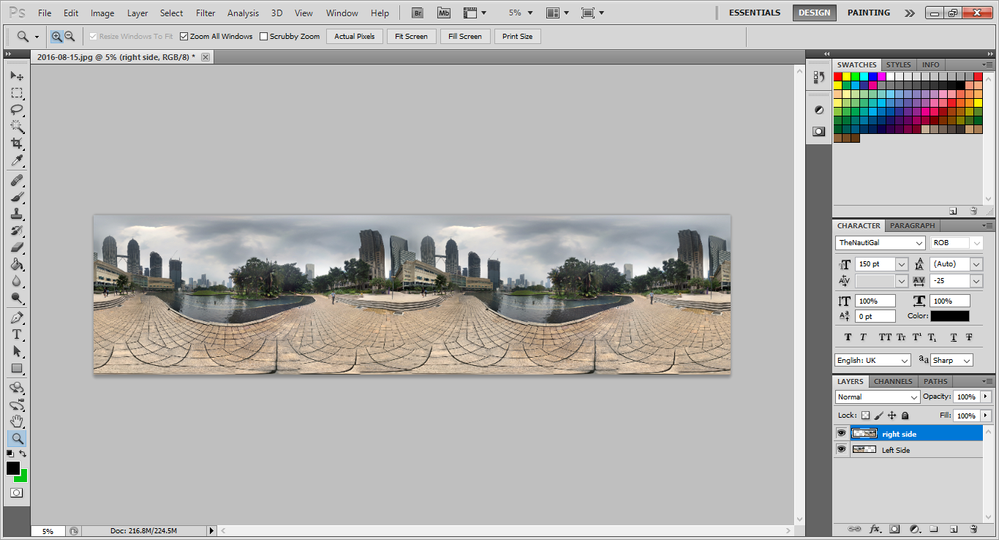
We will then have our canvas filled with exactly the same image twice
The above picture clearly shows the updated canvas layer with no gaps or empty area. I have also renamed the new duplicate layer as right side. Nice, we can now see that we have created the skeleton to wrap our sphere completely.
But, hang on, we just mentioned a moment ago that we wanted a mirror image, but this is not a mirror image.
First things first, why do we need a mirror image?
Well, we want a continuity when we wrap the images around the sphere. That roughly means that after one half is completed, the image should not start right from the beginning, rather, it should extend the continuum (roughly speaking we want the tail of the first, connected to the head of the second).
Step 6:
Right, now that we know why we need the mirror image, let's try to flip the right side layer to follow along our theory.
In order to do that , you have to go to:
Edit > Transform > Flip Horizontal
Flipping in horizontal is what we need to get the mirror image (it will connect the tail of the first to the head of the second)
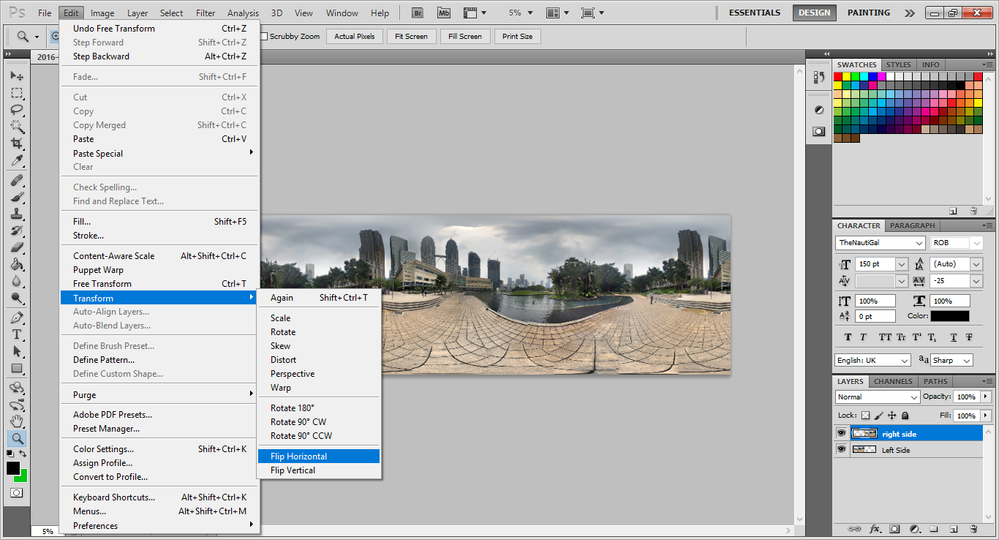
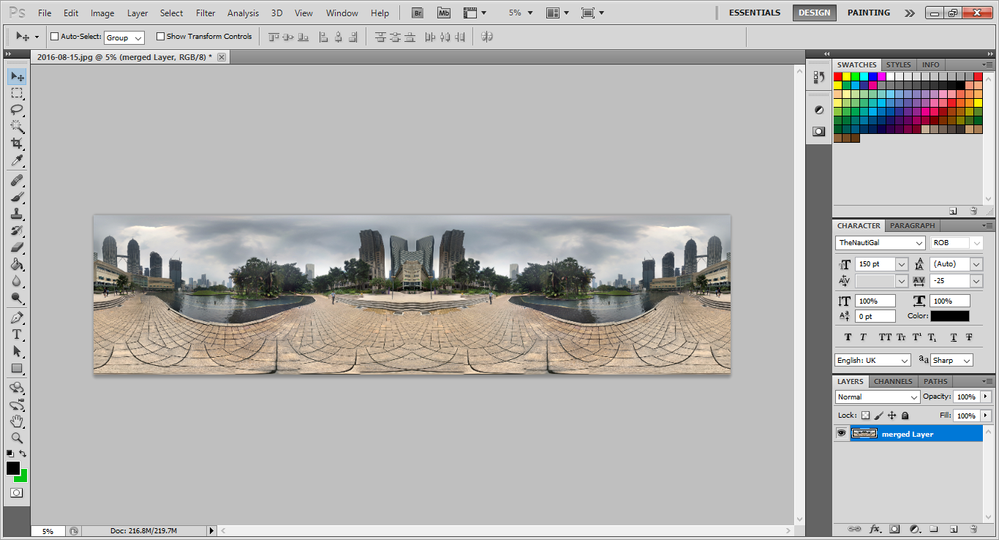
Once we have done that, we will get something like this
Step 7:
Notice how the canvas looks completely balanced. The second image appears to start right from where the first ended.
You must have also noticed that 2 of those layers are gone, instead we only have a single layer (called merged Layer) left.
Well, this is the right time to merge both of the layers so that we can have a large base layer left that we can then wrap around our sphere.
In order to merge the layers,
1. select the right side
2. Press Ctrl + E
3. You can then rename the single layer accordingly ( I have renamed it to merged Layers)
Step 8:
Now is the right time to re-touch your photo. Some people like rich colors, some prefer it with high contrast. Either way it suits you, you can try all your photoshop tricks here.
But, remember, the picture should look in balance, please try to avoid any color leaks or very high contrast edges because its going to look very bad on the Tiny Planet.
Step 9:
Step 9 is considered to be magic trick of creating a Tiny Planet. It is here that you actually prepare your image to change its physics in the next step.
Now think that your Tiny Planet is going to be roughly made up of two Outer Arcs that covers its left and right side. If we try to change our rectangular picture into Polar (or circular rotation) we are going to have our point of focus mapped inside out.
We would love to see our building and other scenic architectures wrapped around on the outside of the sphere rather than on the inside. That is why we are going to flip the image vertically (If you remember high school and conversion from Rectangular to Polar Coordinates, the value of theta follows along the sine and cosine values that make up the full 360. we start from -180 to 0 and then from 0 to 180 thus achieving full 360).
I know we are not interested in maths here, so in simpler terms, if we try to go from Rectangular to Polar (which we are infact) our end image will be inverted (or 180 degrees flipped). So, in order to take care of this problem, we need to Flip our image in advance in order to address the above effect.
In order to do that, go to :
Edit > Transform > Flip Vertical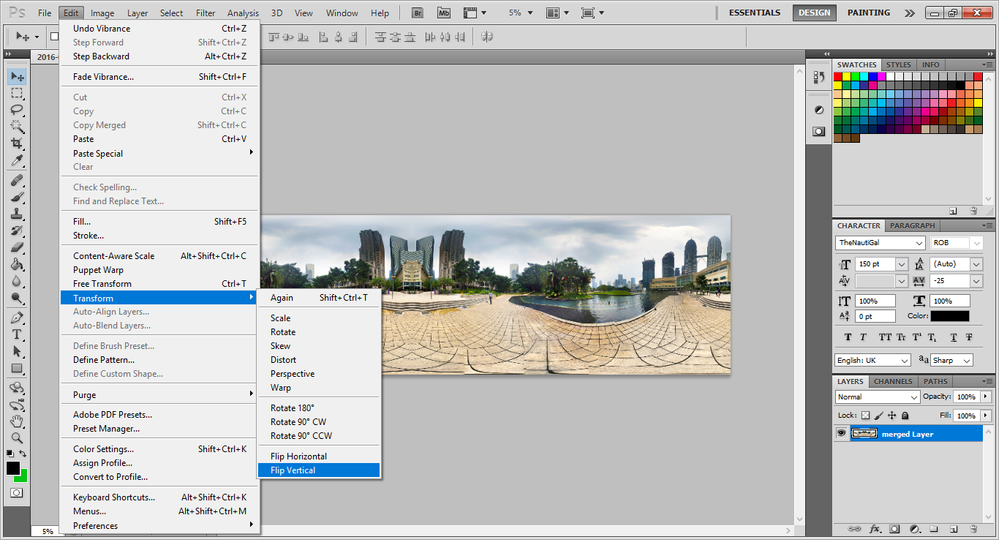
Once the image has been flipped vertically, we must then convert its rectangular coordinates to polar (in order to get a sphere like shape)
In order to do that, go to :
Filter > Distort > Polar Co ordinates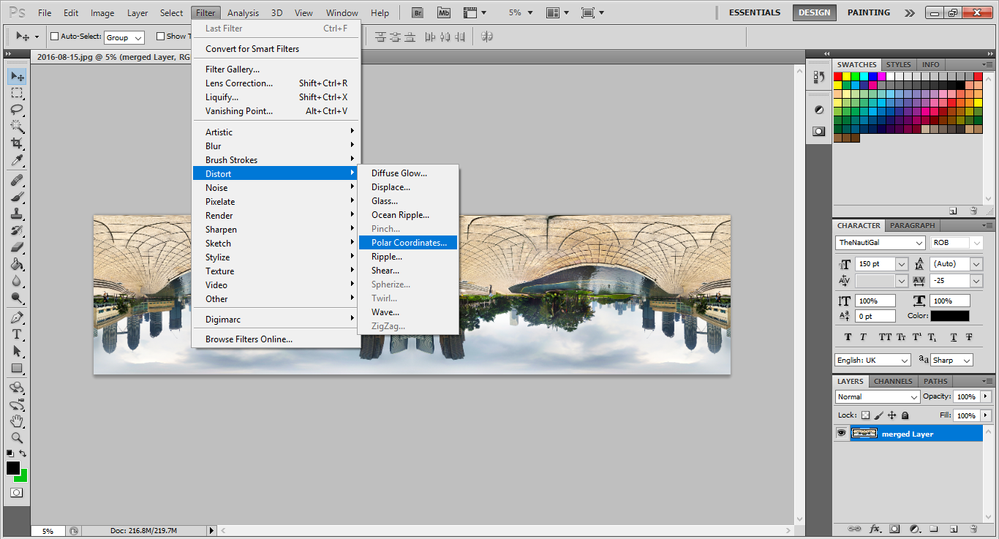
Once you have selected Polar Coordinates, a new pop-up will appear which will give you a rough estimate of how your image is going to be mapped.
Select Rectangular to Polar and hit OK.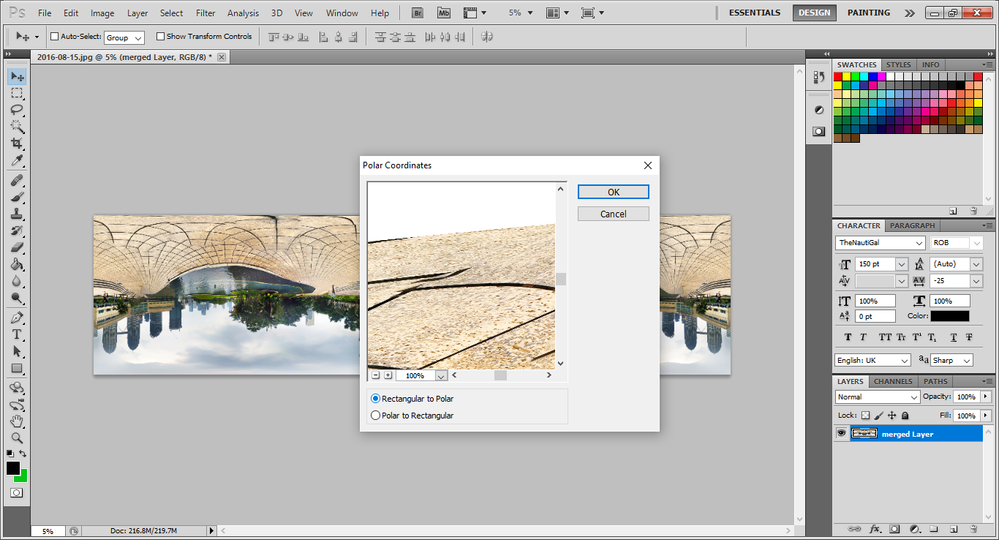
Step 11:
Once you hit OK, you will see a new spherical type image, but, it looks more skewed and far from being spherical.
It is because, now we have a large sphere (in Height, now the height has increased almost double in size) and a small canvas area (half in size) which is unable to fully display our image.
So, we are now going to increase the Height of our canvas to at least 3 times of that of the original image.
In order to do so, go to :
Image > Canvas Size > Height
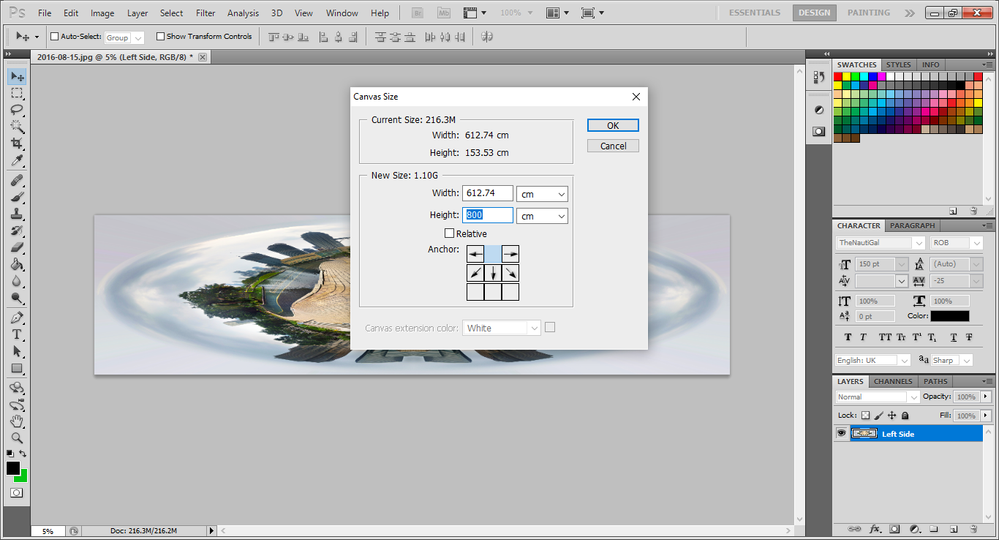
This time increase the Height (because we want our skewed sphere to be able to fully appear on the canvas). I have chosen an arbitrary value of 800 which is more than 3 times the height of the original image.
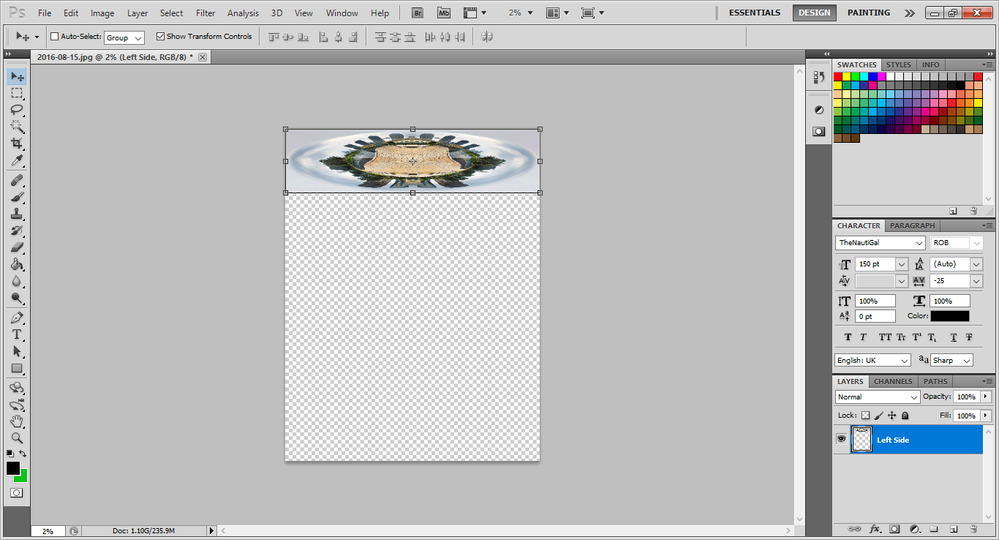
Hit OK, and you will see an increased canvas size, with the skewed sphere placed on the top side, just as it is shown in the image below
You must have noticed the empty space that we now have. It is that transparent real estate area that we are now going to fill it with our sphere.
One best guess how to do it? Yep, be scaling up the image (changing the height of the image until it fits the canvas)
Step 12:
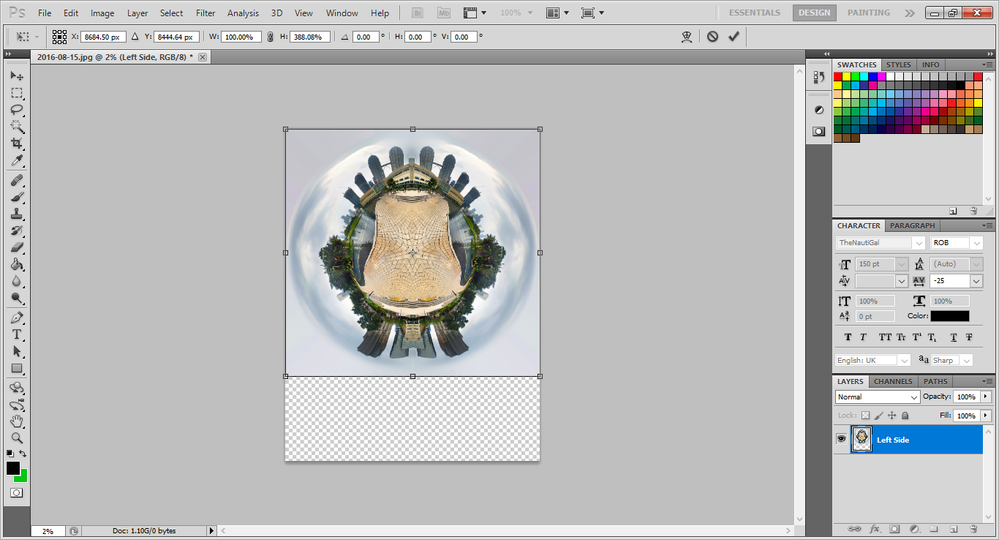
Hit V on your keyboard and then select Show Transform Controls. It will allow you to scale your image.
Scale your image down to fill the empty transparent area on the canvas, until you start getting a spherical object.
There is no hard and fast rule to be considered here, you must scale it until your image looks like a spherical object rather than a skewed circle.
Step 13:
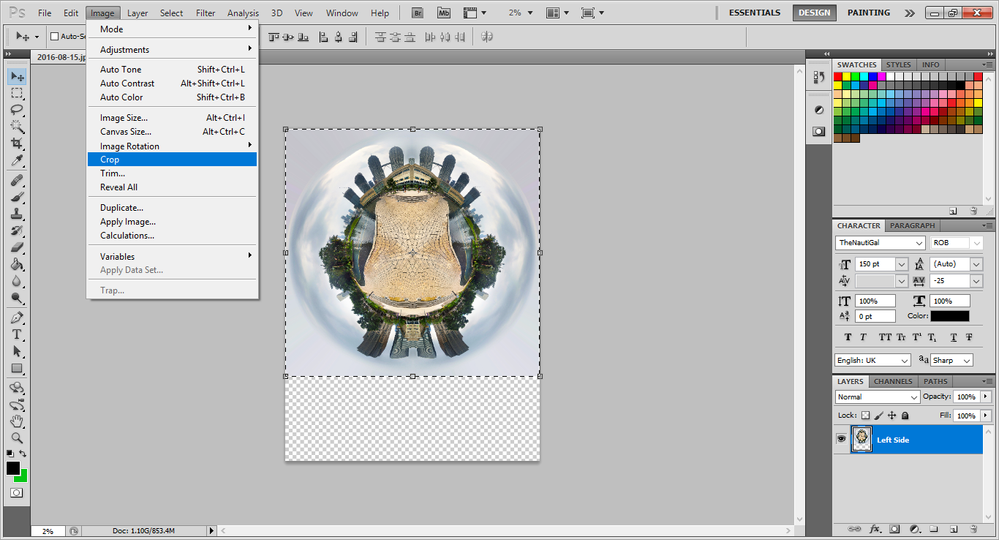
Once you are happy with the results, its time to get rid off the empty area.
In order to do that, go to :
Image > Crop
Step 14:
Hit OK and you will see the first glimpse of your Tiny Planet.
You must have noticed that common points must have some overlapping areas (or in some cases blank areas) which are needed to be taken care of.
In order to adjust some of these faulty overlaps, we need to do some photo re-touching.
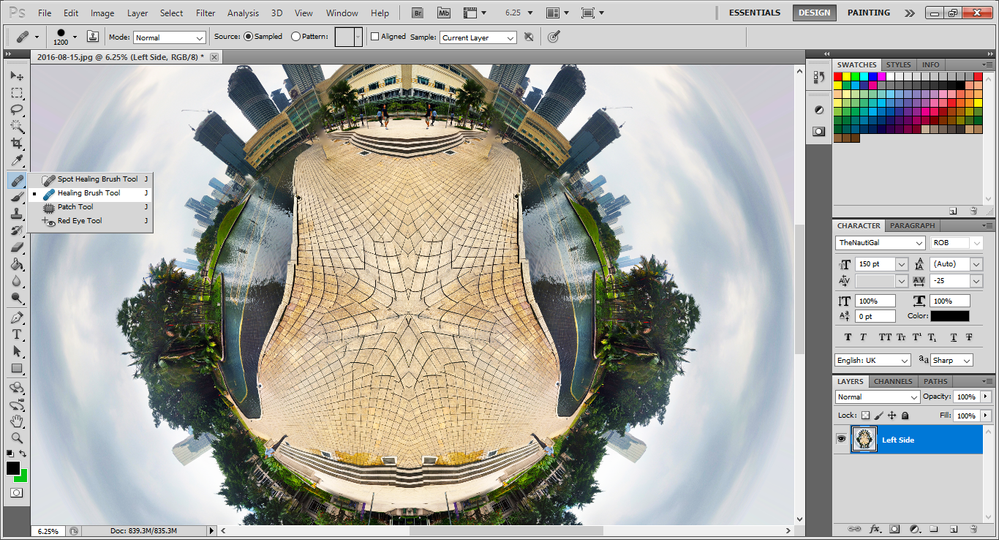
Once excellent tool in Photoshop is the Healing Brush Tool.
In order to access this tool, go to your left hand side bar and click the patch icon
In my case, I used the healing brush to tackle some of the irregularities in the tiles and the skies.
You can also perform other color correction and Image sizing at this stage.
Once you are happy, export your Tiny Planet as a High Resolution image and show the world your creative side 🙂
Mine looked, something like that
I hope you find this little tutorial useful.
Don't forget to share your Tiny Planets in replies to this post
Cheers
P.S. We cannot submit Tiny Planets to google, yet it is quite fun to convert our panoramic shots in to Tiny Planets
- Mark as New
- Bookmark
- Subscribe
- Mute
- Subscribe to RSS Feed
- Permalink
- Report Inappropriate Content
